5. Using the Snakemake pipelines
Rather than chaining together viral-ngs pipeline steps as series of tool commands called in isolation, it is possible to execute them as a complete automated pipeline, from processing raw sequencer output to creating files suitable for GenBank submission. This utilizes Snakemake, which is documented at: https://snakemake.readthedocs.io/en/stable/
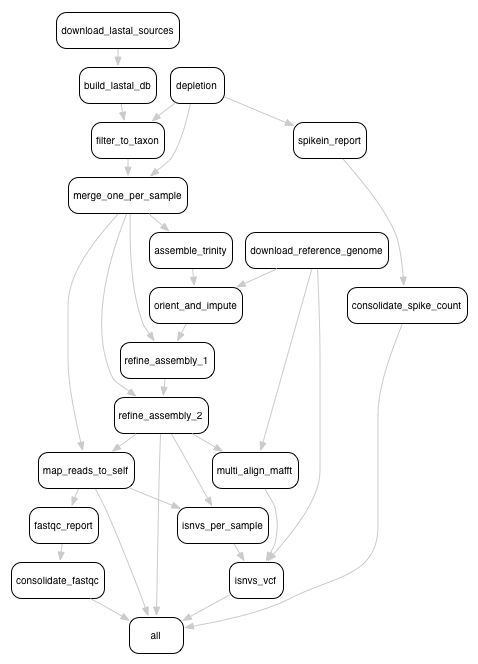
Here is an overview of the Snakemake rule graph:
5.1. Installation instructions
It is recommended to install the viral-ngs conda package from the broad-viral channel, as detailed in the installation section of this documentation.
The script easy-deploy-viral-ngs.sh can be used to install conda and the viral-ngs package on a standard Linux system, as well as to create new project analysis directories. Project directories can also be created manually as described below.
5.2. Setting up an analysis directory
5.2.1. Copying and creating project directories and files
The Snakemake pipline is intended to be run on an input one or more sequencer bam files, each having a filename represending a sample name. The output files are named with the same sample names, and are organized into folders corresponding to the steps of the pipeline in which they were created.
To get started, create an analysis directory somewhere in your compute environment to contain the pipeline input and output files.
Into this directory, copy the following file from the viral-ngs/pipes
directory:
config.yaml
Snakefile
Since the file config.yaml is project-specific, you will need to
make changes to it as approprate for your usage. The config file changes
are described in greater detail below.
Next, cd to the analysis directory and create symbolic links to the
following:
The viral-ngs virtual environment:
ln -s /path/to/venv-viral-ngs venvThe viral-ngs project, checked out from GitHub or extracted from a version-tagged archive:
ln -s /path/to/viral-ngs bin
Within the analysis directory, create the directories and files used by the Snakemake pipeline:
data/
    00_raw/
    01_cleaned/
    01_per_sample/
    02_align_to_self/
    02_assembly/
    03_align_to_ref/
    03_interhost/
    04_intrahost/
log/
reports/
tmp/
The directory structure created needs to match the locations specified
in config.yaml.
5.2.2. Adding input data
Copy each of the raw sample bam files to the
00_raw/directory and ensure the file names follow the convention of{sample}.bam.Create a file,
samples-depletion.txt, to list all of the samples that should be run through the depletion pipeline, with one samplename per line as {sample}, following the format of the input bam file:{sample}.bam. For example, if you copied a file called “G1190.bam” into00_raw/, then thensamples-depletion.txtwould contain the line:G1190Create a file,
samples-assembly.txt, to list all of the samples that should be run through the assembly pipeline.Create a file,
samples-runs.txt, to list all of the samples that should be run through the interhost analysis pipeline.Create a blank file,
samples-assembly-failures.txt, that may be filled in later.
5.2.3. Modifying the config.yaml file
Minimal modification to the config file is necessary, though there are a few things you need to specify:
An email address for when the pipeline fetches reference data from the NCBI via their Entrez API:
email_point_of_contact_for_ncbi: "someone@example.com"
The path to the depletion databases to be used by BMTagger, along with the file prefixes of the specific databases to use. The process for creating BMTagger depletion databases is described in the NIH BMTagger docs.
bmtagger_db_dir: "/path/to/depletion_databases"
bmtagger_dbs_remove:
  - "hg19"
  - "GRCh37.68_ncRNA-GRCh37.68_transcripts-HS_rRNA_mitRNA"
  - "metagenomics_contaminants_v3"
Pre-built depletion databases are available in both *.tar.gz and *.lz4 format, for removing human reads and common metagenomic contaminants:
- GRCh37.68_ncRNA-GRCh37.68_transcripts-HS_rRNA_mitRNA.tar.gz (*.lz4)
- hg19.tar.gz (*.lz4)
- metagenomics_contaminants_v3.tar.gz (*.lz4)
Note that these databases must be extracted prior to use.
In addition to the databases used by BMTagger, you will need to specify the location and file prefix of the BLAST database to be used for depletion. The process for creating the BLAST database is described in the NIH BLAST docs, and on this website from the University of Oxford.
blast_db_dir: "/path/to/depletion_databases"
blast_db_remove: "metag_v3.ncRNA.mRNA.mitRNA.consensus"
A pre-built depletion database is also available for BLAST:
Note that this database must be extracted prior to use.
Additional databases are needed to perform metagenomic classification using Kraken, Diamond, or Krona.
kraken_db: "/path/to/kraken_full_20150910"

diamond_db: "/path/to/diamond_db/nr"

krona_db: "/path/to/krona"
Pre-built databases for Kraken, Diamond, and Krona are available:
- kraken_ercc_db_20160718.tar.gz including ERCC spike-in RNA seqs (*.lz4)
- kraken_db.tar.gz (*.lz4)
- krona_taxonomy_20160502.tar.gz (*.lz4)
- nr.dmnd.gz (*.lz4)
Note that these databases must be extracted prior to use.
An array of the NCBI GenBank CoreNucleotide accessions for the sequences comprising the reference genome to be used for contig assembly as well as for interhost and intrahost variant analysis. In addition, you will need to specify a file prefix to be used to represent the full reference genome file used downstream.
accessions_for_ref_genome_build:
  - "KJ660346.2"
An optional file containing a list of accessions may be specified for filtering reads via LAST. This is intended to narrow to a genus. If this file is not provided, viral-ngs defaults to using the accessions specified for the reference genome.
accessions_file_for_lastal_db_build: "/path/to/lastal_accessions.txt"
A FASTA file to be used by Trimmomatic during assembly to remove contaminents from reads:
trim_clip_db: "/path/to/depletion_databases/contaminants.fasta"
Pre-built databases for Trimmomatic:
A FASTA file containing spike-ins to be reported:
spikeins_db: "/path/to/references/ercc_spike-ins.fasta"
5.2.4. Modifying the Snakefile
Depending on the state of your input data, and where in the pipeline it
may enter, it may be necessary to omit certain processing steps. For
example, if your sequencing center has already demultiplexed your data
and no demultiplexing is needed, you can comment out the following line
in the Snakefile:
include: os.path.join(pipesDir, 'demux.rules’)
5.3. Running the pipeline
5.3.1. Configuring for your compute platform
5.3.2. Running the pipeline directly
After the above setup is complete, run the pipeline directly by calling
snakemake within the analysis directory.
5.3.3. When things go wrong
The pipeline may fail with errors during execution, usually while
generating assemblies with Trinity. If this occurs, examine the output,
add the failing sample names to samples-assembly-failures.txt,
keeping the good ones in samples-assembly.txt, and re-run the
pipeline. Due to sample degradation prior to sequencing in the wet lab,
not all samples have the integrity to complete the pipeline, and it may
necessary to skip over these samples by adding them to the
samples-assembly-failures.txt.
5.4. Assembly of pre-filtered reads
5.5. Taxonomic filtration of raw reads
5.6. Starting from Illumina BCL directories
When starting from Illumina run directories, the viral-ngs Snakemake pipeline can demultiplex raw BCL files, and merge samples from multiple flowcell lanes or libraries. To use viral-ngs in this way, create the following files:
flowcells.txt (example below): A tab-delimited file describing the flowcells to demultiplex, as well as the lane to use,
a path to the file listing the barcodes used in the lane, the bustard_dir (the run directory as written by an Illumina sequencer),
and an optional column for max_mismatches, which specifies how many bases are allowed to differ for a read to be assigned to a particular barcode (default: 0). The column max_mismatches may be omitted, including its header.
flowcell        lane    barcode_file    bustard_dir     max_mismatches
H32G3ADXY       1       /path/to/barcodes.txt    /path/to/illumina/run/directory/run_BH32G3ADXY 1
H32G3ADXY       2       /path/to/barcodes.txt    /path/to/illumina/run/directory/run_BH32G3ADXY 1
AKJ6R   1       /path/to/barcodes.txt      /path/to/illumina/run/directory/run_AKJ6R      1
barcodes.txt (example below): A tab-delimited file describing the barcodes used for a given sample, along with a library ID.
sample  barcode_1       barcode_2       library_id_per_sample
41C     TAAGGCGA        TATCCTCT        AP2
21P     CGTACTAG        TATCCTCT        AP2
42C     AGGCAGAA        TATCCTCT        AP2
41P     TCCTGAGC        TATCCTCT        AP2
42P     GGACTCCT        TATCCTCT        AP2
61C     TAGGCATG        TATCCTCT        AP2
61P     CTCTCTAC        AGAGTAGA        AP2
62C     CAGAGAGG        AGAGTAGA        AP2
62P     GCTACGCT        AGAGTAGA        AP2
142C    CGAGGCTG        AGAGTAGA        AP2
WATERCTL        AAGAGGCA        AGAGTAGA        AP2
samples-depletion.txt: the list of sample names to deplete as described above.